Tag: chicken recipes

  • Delicious Creamy White Chicken Chili Recipe

    Delicious Creamy White Chicken Chili Recipe

    There’s something especially comforting about wrapping your hands around a warm bowl of chili after a long day. This Creamy White Chicken Chili has all the cozy qualities you want in a slow cooker dinner, but with a lighter, creamier flavor than traditional red chili.

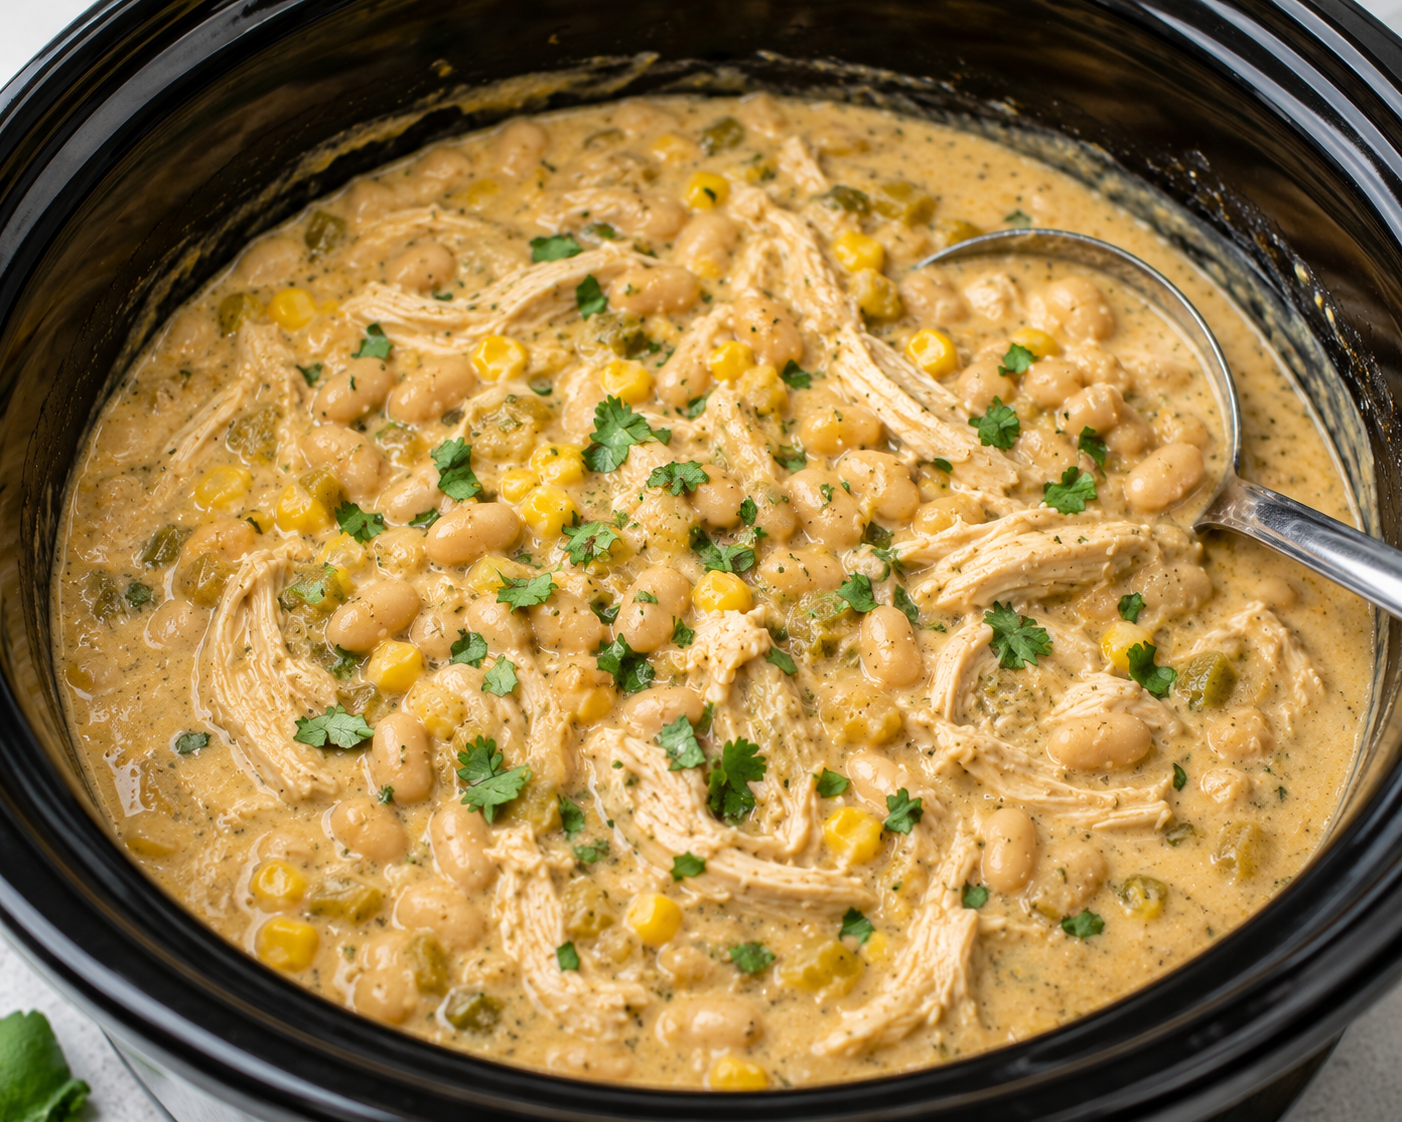
    Tender shredded chicken, buttery white beans, sweet pops of corn, mild green chiles, and warm spices slowly simmer together in a savory chicken broth. Cream cheese is stirred in at the end, transforming the broth into a rich, velvety base that coats every spoonful.

    Top your bowl with creamy avocado, shredded cheese, crunchy tortilla chips, fresh cilantro, and a squeeze of lime, and you get a delicious combination of creamy, crunchy, savory, and fresh flavors.

    Even better, the slow cooker handles most of the work. With about 10 minutes of prep, you can have dinner simmering away while you get on with the rest of your day.

    Why You’ll Love This White Chicken Chili

    This recipe is perfect for busy weeknights, chilly weekends, game days, or anytime you want a hearty dinner without spending hours standing over the stove.

    You’ll love it because it’s:

    • Easy to prepare
    • Made with simple pantry staples
    • Creamy without being overly heavy
    • Easy to customize
    • Great for leftovers
    • Perfect for a toppings bar

    And honestly, the toppings might be the best part. Put several bowls on the table and let everyone build their perfect bowl of chili.

    What Is White Chicken Chili?

    Traditional American chili is often associated with beef, tomatoes, beans, and red chile seasonings, but there are countless regional and household variations.

    White chicken chili is a popular variation that typically swaps the beef and tomato base for chicken, white beans, green chiles, and chicken broth. Many creamy versions also include cream cheese, sour cream, or another dairy ingredient.

    The result is still hearty and comforting like traditional chili, but with a creamy texture and milder flavor profile.

    This slow cooker version keeps things especially simple.

    Creamy White Chicken Chili Recipe

    Prep Time: 10 minutes
    Cook Time: About 7 hours on Low
    Servings: 6–8

    This recipe makes approximately 6 generous dinner-sized servings or 8 smaller servings, depending on your portion size and the toppings or sides you serve with it.

    If you’re feeding several hungry adults and want leftovers, consider making a larger batch if your slow cooker has enough capacity.

    Ingredients

    • 2 boneless, skinless chicken breasts
    • 2 (15-ounce) cans white beans, drained and rinsed
    • 1 (15-ounce) can corn, drained
    • 1 (4-ounce) can diced green chiles
    • 1 medium onion, chopped
    • 4 cups chicken broth
    • 1 tsp ground cumin
    • 1 tsp chili powder
    • 4 oz cream cheese, softened

    Ingredient Tips

    Chicken

    Boneless, skinless chicken breasts keep preparation simple. Boneless chicken thighs can also work well if you prefer darker, juicier meat.

    White Beans

    Cannellini beans or Great Northern beans are both good choices. Cannellini beans tend to be larger and creamier, while Great Northern beans have a slightly firmer texture.

    Choose no-salt-added or lower-sodium canned beans if you’re trying to control the sodium, and drain and rinse them before adding them to the slow cooker.

    Corn

    Regular canned sweet corn works perfectly. Frozen corn can also be used.

    Green Chiles

    A 4-ounce can of mild diced green chiles gives the chili flavor without adding too much heat. Choose medium or hot green chiles if you prefer a spicier bowl.

    Chicken Broth

    Use your favorite chicken broth or stock. A lower-sodium variety gives you more control over the final seasoning.

    Cream Cheese

    Full-fat cream cheese creates the richest texture, but reduced-fat cream cheese can also be used if preferred.

    You don’t need an expensive specialty brand for this recipe. Familiar grocery-store brands work well—focus more on choosing the type of ingredient that suits your preferences, such as low-sodium broth, mild green chiles, or full-fat versus reduced-fat cream cheese.

    How to Make Creamy White Chicken Chili

    Step 1: Add the Ingredients

    Place the chicken breasts in the slow cooker.

    Add the white beans, corn, green chiles, chopped onion, chicken broth, cumin, and chili powder.

    Give everything around the chicken a gentle stir.

    Step 2: Slow Cook

    Cover and cook on Low for approximately 7 hours, or until the chicken is fully cooked and tender enough to shred easily.

    Slow cookers can vary, so check the chicken for doneness rather than relying solely on cooking time.

    Step 3: Shred the Chicken

    Remove the cooked chicken and place it on a clean plate or cutting board.

    Use two forks to gently pull the chicken apart into bite-sized shreds.

    Easy Shredding Tip: Chicken is much easier to shred while it’s still warm. Hold the chicken steady with one fork and use the second fork to pull the meat apart along the grain. Don’t shred it too finely—you want enough texture to get tender pieces of chicken in every spoonful.

    Return the shredded chicken to the slow cooker.

    Step 4: Make It Creamy

    Cut the softened cream cheese into smaller pieces and add it to the chili.

    Stir until the cream cheese has completely melted into the broth and the chili becomes smooth and creamy.

    Taste and adjust the seasoning before serving.

    Don’t Forget the Toppings

    This is where you can really make each bowl your own.

    Try:

    • Diced avocado
    • Fresh cilantro
    • Shredded Monterey Jack or cheddar cheese
    • Crushed tortilla chips
    • Sliced green onions
    • Jalapeño slices
    • Sour cream
    • Fresh lime wedges
    • Hot sauce

    One of my favorite combinations is avocado, crunchy tortilla chips, cilantro, and plenty of fresh lime. The cool avocado and bright citrus are especially good against the warm, creamy broth.

    What to Serve With White Chicken Chili

    Although this chili can easily be a complete meal by itself, a few simple sides can make dinner feel even more substantial.

    Try serving it with warm cornbread, tortilla chips and salsa, cheese quesadillas, a simple green salad, or warm flour tortillas.

    For a casual family dinner or game day, set up a chili bar with several toppings and let everyone customize their bowl.

    Make It Your Own

    Make It Spicier

    Add sliced jalapeños, cayenne pepper, hot green chiles, or your favorite hot sauce.

    Keep It Mild

    Use mild green chiles and mild chili powder, then allow anyone who wants additional heat to add hot sauce at the table.

    Make It Extra Creamy

    Add a little additional cream cheese or stir in a spoonful of sour cream before serving.

    Make It Lighter

    Reduce or omit the cream cheese for a brothier white chicken chili.

    Dairy-Free Variation

    Leave out the cream cheese or experiment with your preferred dairy-free cream cheese alternative. Check the labels of packaged ingredients if you’re preparing the recipe for a specific dietary need.

    Add More Vegetables

    Bell peppers or additional corn can easily be added to bulk up the chili.

    How to Store Leftover White Chicken Chili

    Allow leftover chili to cool and transfer it to an airtight container.

    Refrigerate promptly and enjoy the leftovers within 3–4 days.

    The chili may become thicker after sitting in the refrigerator because the beans and other ingredients continue absorbing some of the liquid.

    How to Reheat It

    Stovetop

    Place the chili in a saucepan and warm it gently over medium-low heat, stirring occasionally.

    If it has become too thick, add a splash of chicken broth until it reaches your preferred consistency.

    Microwave

    Place an individual serving in a microwave-safe bowl and reheat until steaming hot, stirring periodically so it heats evenly.

    Add fresh toppings after reheating rather than storing avocado, tortilla chips, cilantro, or other garnishes in the chili.

    Can You Freeze White Chicken Chili?

    You can freeze leftovers, although creamy soups and chilis can sometimes change slightly in texture after freezing and thawing.

    For the best freezer-friendly approach, you can prepare the chili without the cream cheese, freeze the base, and stir in fresh cream cheese while reheating.

    Cool the chili completely before transferring it to freezer-safe containers, leaving appropriate room for expansion.

    Estimated Nutrition

    Approximately 320 calories per serving, depending on whether the recipe is divided into 6 or 8 portions and which ingredients and toppings are used.

    Nutrition information is an estimate and can vary significantly according to ingredient brands, substitutions, portion sizes, and toppings.

    Build Your Perfect Bowl

    There’s a lot to love about a dinner that can quietly simmer in the slow cooker and turn into something this warm and satisfying by the end of the day.

    Now comes the important question: What goes on your perfect bowl of white chicken chili?

    Are you team avocado and lime? Extra cheese? A mountain of crunchy tortilla chips? Or do you turn up the heat with jalapeños and hot sauce?

    If you make this Creamy White Chicken Chili, leave a comment and tell me how you customized your bowl. And if you discover a delicious variation, share that too—you might inspire someone else’s next crockpot dinner.

    Creamy White Chicken Chili

    Prep Time10 minutes
    Cook Time7 hours
    Servings: 6

    Ingredients

    • 2 boneless chicken breasts
    • 2 cans white beans drained and rinsed
    • 1 can corn drained
    • 1 can diced green chiles
    • 1 onion chopped
    • 4 cups chicken broth
    • 1 tsp cumin
    • 1 tsp chili powder
    • 4 oz cream cheese

    Instructions

    • Add everything except the cream cheese to the slow cooker.
    • Cook on Low until the chicken is tender and fully cooked.
    • Remove and shred the chicken.
    • Return it to the slow cooker.
    • Stir in cream cheese until melted and creamy.

    Notes

    Leave out the cream cheese for a lighter, dairy-free-style chili, or use your preferred dairy-free cream cheese alternative.  Add jalapeños if your family likes extra heat.
  • Easy Hibachi Chicken and Fried Rice Recipe

    Easy Hibachi Chicken and Fried Rice Recipe

    Craving hibachi without the restaurant trip? This easy hibachi chicken and fried rice recipe brings those buttery, garlicky, savory flavors right to your kitchen. Juicy chicken, flavorful fried rice, vegetables, and creamy yum-yum sauce come together for a meal that feels special without being complicated.

    You don’t need a restaurant-style flat-top grill, either. A large skillet, cast-iron pan, or home griddle works beautifully.

    What Is Hibachi Cooking?

    In the United States, the word hibachi is often used to describe the Japanese steakhouse-style meals prepared on a large, hot flat-top grill in front of diners.

    Chicken, steak, shrimp, vegetables, and fried rice are commonly cooked quickly over high heat with ingredients such as butter, garlic, soy sauce, and sesame oil.

    Traditional Japanese hibachi cooking is actually different and typically involves cooking over a small charcoal grill. This recipe is inspired by the Japanese-American steakhouse version many people know and love.

    Why You’ll Love This Recipe

    This homemade hibachi dinner is:

    • Quick enough for a weeknight
    • Family-friendly
    • Easy to customize
    • Made with simple grocery-store ingredients
    • Perfect for using leftover rice
    • Delicious with homemade yum-yum sauce

    The chicken gets beautifully browned before being tossed with garlic butter and soy sauce, while the rice cooks until savory and lightly toasted.

    And yes, the butter is doing some serious heavy lifting here.

    Ingredients

    For the Hibachi Chicken

    • 1½ pounds boneless, skinless chicken breast, cut into bite-size pieces
    • 1 tablespoon neutral cooking oil
    • 2 tablespoons butter
    • 2 tablespoons soy sauce
    • 2 cloves garlic, minced
    • ½ teaspoon black pepper
    • ½ teaspoon sesame oil, optional

    For the Fried Rice

    • 4 cups cooked cold white rice
    • 2 eggs
    • 2 tablespoons butter
    • 1 tablespoon neutral cooking oil
    • ½ cup diced onion
    • ½ cup frozen peas and carrots
    • 2–3 tablespoons soy sauce
    • 1 teaspoon sesame oil
    • 2 green onions, sliced
    • Black pepper, to taste

    For the Quick Yum-Yum Sauce

    • ½ cup mayonnaise
    • 1 tablespoon ketchup
    • 1 tablespoon melted butter
    • ½ teaspoon garlic powder
    • ½ teaspoon paprika
    • 1 teaspoon sugar
    • 1–2 tablespoons water

    How to Make Hibachi Chicken and Fried Rice

    1. Cook the Chicken

    Heat a large skillet or griddle over medium-high to high heat. Add the oil, followed by the chicken.

    Spread the pieces into a single layer so they have room to brown instead of steam.

    Cook for about 5–7 minutes, stirring occasionally, until the chicken is nearly cooked through.

    Add the butter, soy sauce, minced garlic, black pepper, and sesame oil. Toss everything together and cook for another 1–2 minutes, until the chicken is fully cooked and coated in the buttery sauce.

    Transfer the chicken to a plate and keep warm.

    2. Scramble the Eggs

    In the same pan, add a small amount of butter if needed.

    Add the eggs and scramble, breaking them into small pieces as they cook.

    Once cooked, push them to one side of the pan or transfer them to a plate.

    3. Cook the Vegetables

    Add the oil and butter to the hot pan.

    Stir in the diced onion and frozen peas and carrots. Cook for 2–3 minutes, until the vegetables begin to soften.

    4. Fry the Rice

    Add the cold cooked rice and break apart any clumps.

    Spread the rice across the hot surface and let it sit untouched for 30–60 seconds before stirring.

    Repeat this a few times. Giving the rice a little contact time with the hot pan helps create the lightly toasted texture that makes fried rice so good.

    5. Season the Fried Rice

    Add the scrambled eggs back to the pan.

    Stir in 2 tablespoons of soy sauce, sesame oil, sliced green onions, and black pepper.

    Cook for another 2–3 minutes.

    Taste before adding the remaining tablespoon of soy sauce. Depending on the brand you use, you may not need it.

    6. Make the Yum-Yum Sauce

    In a small bowl, whisk together the mayonnaise, ketchup, melted butter, garlic powder, paprika, and sugar.

    Add water one tablespoon at a time until the sauce reaches your preferred consistency.

    You can serve it immediately, but refrigerating it for 30 minutes or longer allows the flavors to blend even more.

    Ways to Customize Your Hibachi Dinner

    One of the best things about homemade hibachi is how easy it is to make it your own.

    Swap the Protein

    Instead of chicken, try:

    • Steak
    • Shrimp
    • Salmon
    • Pork
    • Tofu
    • A combination of chicken and shrimp

    Cooking times will vary depending on the protein, so make sure meat and seafood reach a safe internal temperature before serving.

    Add More Vegetables

    You can also add:

    • Zucchini
    • Mushrooms
    • Broccoli
    • Bell peppers
    • Snap peas
    • Carrots
    • Cabbage
    • Yellow squash
    • Green beans

    For the best texture, cook larger vegetables separately from the rice and combine everything at the end.

    Make It Vegetarian

    Skip the chicken and double up on vegetables, mushrooms, tofu, or another plant-based protein.

    Use your preferred vegetarian soy sauce or seasoning if needed.

    Tips for the Best Hibachi Fried Rice

    Use cold rice. Freshly cooked rice contains more moisture and can turn soft or mushy when fried. Day-old refrigerated rice is ideal.

    Use a large cooking surface. A wide skillet or griddle gives the ingredients room to brown.

    Get the pan hot. High heat helps create the seared flavor associated with hibachi-style cooking.

    Cook in batches when necessary. An overcrowded pan traps steam and makes browning difficult.

    Go easy on the soy sauce. You can always add more, but removing it is considerably trickier.

    Use butter. Butter gives the chicken and rice much of their rich steakhouse-style flavor.

    Common Hibachi Mistakes to Avoid

    Using Warm, Freshly Cooked Rice

    Warm rice is more likely to clump together and become mushy.

    Whenever possible, cook your rice ahead of time and refrigerate it until completely cold.

    Overcrowding the Pan

    Adding too much chicken or rice at once can cause the ingredients to steam rather than sear.

    If you’re using a smaller skillet, divide the ingredients into batches.

    Constantly Stirring the Rice

    It’s tempting to keep everything moving, but the rice needs brief periods of contact with the hot pan to develop toasted flavor.

    Let it sit for 30–60 seconds between stirs.

    Adding Too Much Soy Sauce

    More soy sauce doesn’t necessarily mean more flavor.

    Too much can make the finished dish overly salty and wet. Start with less and add more after tasting.

    Adding Garlic Too Early

    Garlic burns quickly over high heat.

    Add it toward the end of cooking the chicken so it becomes fragrant without turning bitter.

    Using Too Little Heat

    Hibachi-style cooking works best over relatively high heat.

    Make sure your skillet or griddle is properly heated before adding the food.

    What to Serve With Hibachi Chicken

    The chicken and fried rice can easily stand alone as a complete meal, but a few extras can turn it into a full steakhouse-style spread.

    Try serving it with:

    • Garlic-butter zucchini and onions
    • Sautéed mushrooms
    • Steamed or roasted broccoli
    • Asian-style cucumber salad
    • Simple green salad with ginger dressing
    • Miso soup
    • Clear onion soup
    • Teriyaki sauce
    • Ginger dipping sauce
    • Extra yum-yum sauce

    Beverage Pairings

    For a refreshing nonalcoholic pairing, try:

    • Unsweetened iced green tea
    • Jasmine tea
    • Sparkling water with lemon or lime
    • Ginger ale
    • Cucumber-infused water

    The savory chicken and rice also work nicely alongside other Japanese-American steakhouse favorites, such as grilled shrimp, steak, sautéed vegetables, or a light ginger-dressed salad.

    How to Store Leftovers

    Allow the chicken and rice to cool before transferring them to airtight containers.

    Refrigerate leftovers within 2 hours of cooking.

    For the best quality, enjoy refrigerated hibachi chicken and rice within 3–4 days.

    Store the yum-yum sauce separately in a covered container in the refrigerator and use it within about 3–4 days for best freshness.

    How to Reheat Hibachi Chicken and Rice

    For the best texture, reheat the chicken and rice in a skillet.

    Add a small pat of butter or splash of oil to a pan over medium heat. Add the leftovers and cook, stirring occasionally, until everything is steaming hot throughout.

    You can also microwave individual portions. Cover loosely and heat in short intervals, stirring between each interval to help the food warm evenly.

    Avoid reheating leftovers multiple times. Reheat only the portion you plan to eat.

    Easy Hibachi Dinner at Home

    You don’t need a special occasion—or someone launching a shrimp across the room—to enjoy a good hibachi dinner.

    With juicy garlic-butter chicken, savory fried rice, colorful vegetables, and creamy yum-yum sauce, this homemade hibachi chicken recipe delivers plenty of Japanese steakhouse-inspired flavor without requiring complicated techniques or specialty equipment.

    Even better, you can customize the protein and vegetables depending on what your family likes or what happens to be hiding in the refrigerator.

    That makes this one especially handy for turning leftover rice into a dinner people actually get excited about.


    Hibachi Chicken & Rice

    Prep Time15 minutes
    Cook Time20 minutes
    Total Time35 minutes
    Servings: 4

    Ingredients

    For the Hibachi Chicken

    • 1 ½ pounds boneless, skinless chicken breast cut into bite-size pieces
    • 1 tbsp neutral cooking oil
    • 2 tbsp butter
    • 2 tbsp soy sauce
    • 2 cloves garlic minced
    • ½ tsp black pepper
    • ½ tsp sesame oil optional

    For the Fried Rice

    • 4 cups cooked cold white rice
    • 2 eggs
    • 2 tbsp butter
    • 1 tbsp neutral cooking oil
    • ½ cup sweet onion diced
    • ½ cup frozen peas and carrots
    • 2-3 tbsp soy sauce
    • 1 tsp sesame oil
    • 2 green onions sliced
    • black peper to taste

    Instructions

    • Heat a large skillet or griddle over medium-high to high heat. Add the oil, followed by the chicken.
    • Spread the chicken out so the pieces have room to brown instead of steam. Cook for about 5-7 minutes, stirring occasionally, until the chicken is nearly cooked through.
    • Add the butter, soy sauce, minced garlic, black pepper, and sesame oil. Toss everything together and cook for another 1-2 minutes, or until the chicken is fully cooked and coated in that buttery hibachi-style sauce.
    • Transfer the chicken to a plate to keep it warm.
    • In the same pan, add a small amount of butter if needed. Crack. in the eggs and scramble them, breaking them into small pieces as they cook.
    • Once cooked, push the eggs to one side of the pan or transfer them to a plate while you prepare the rice.
    • Add the oil and butter to the hot pan, followed by the diced onion and frozen peas and carrots.
    • Cook for 2-3 minutes, until the onion begins to soften.
    • Add the cold cooked rice. Break up any clumps and spread the rice across the hot surface of the pan. Let it sit untouched for 30-60 seconds at a time before stirring. This helps the rice develop those lightly toasted bits that make fried rice so good.
    • Add the scrambled eggs back to the pan along with 2 tablespoons of soy sauce, sesame oil, sliced green onions, and black pepper.
    • Toss everything together and cook for another 2-3 minutes. Taste and add the remaining tablespoon of soy sauce if you want a stronger flavor.
    • Use Cold rice. Freshly cooked warm rice contains more moisture and can turn soft or mushy when fried. Leftover refrigerated rice works beautifully.

    Notes

    This chicken and fried rice is filling enough to be a complete meal, but you can also serve it with: 
    • Sauteed zucchini and onions
    • Mushrooms cooked in garlic butter
    • Steamed broccoli
    • A simple side salad with ginger dressing
    • Extra yum-yum sauce
    • Teriyaki or ginger dipping sauce

    Easy Yum-Yum Sauce

    Prep Time5 minutes
    Chill time30 minutes
    Total Time35 minutes
    Servings: 8

    Ingredients

    • ½ cup mayonnaise
    • 1 tbsp ketchup
    • 1 tbsp butter melted
    • ½ tsp garlic powder
    • ½ tsp paprika
    • 1 tsp sugar
    • 1 tsp apple cider vinegar

    Instructions

    • In a small bowl, whisk together the mayonnaise, ketchup, melted butter, vinegar, garlic powder, paprika, and sugar.
    • Add water one tablespoon at a time until the sauce reaches your preferred consistency.
    • You can serve it immediately, but refrigerating it for 30 minutes or longer allows the flavors to blend even more.
  • Creamy Ranch Chicken: An Easy Crockpot Dinner

    Creamy Ranch Chicken: An Easy Crockpot Dinner

    There’s something especially satisfying about a dinner that tastes rich and comforting but requires very little work. This Crockpot Creamy Ranch Chicken is exactly that kind of meal.

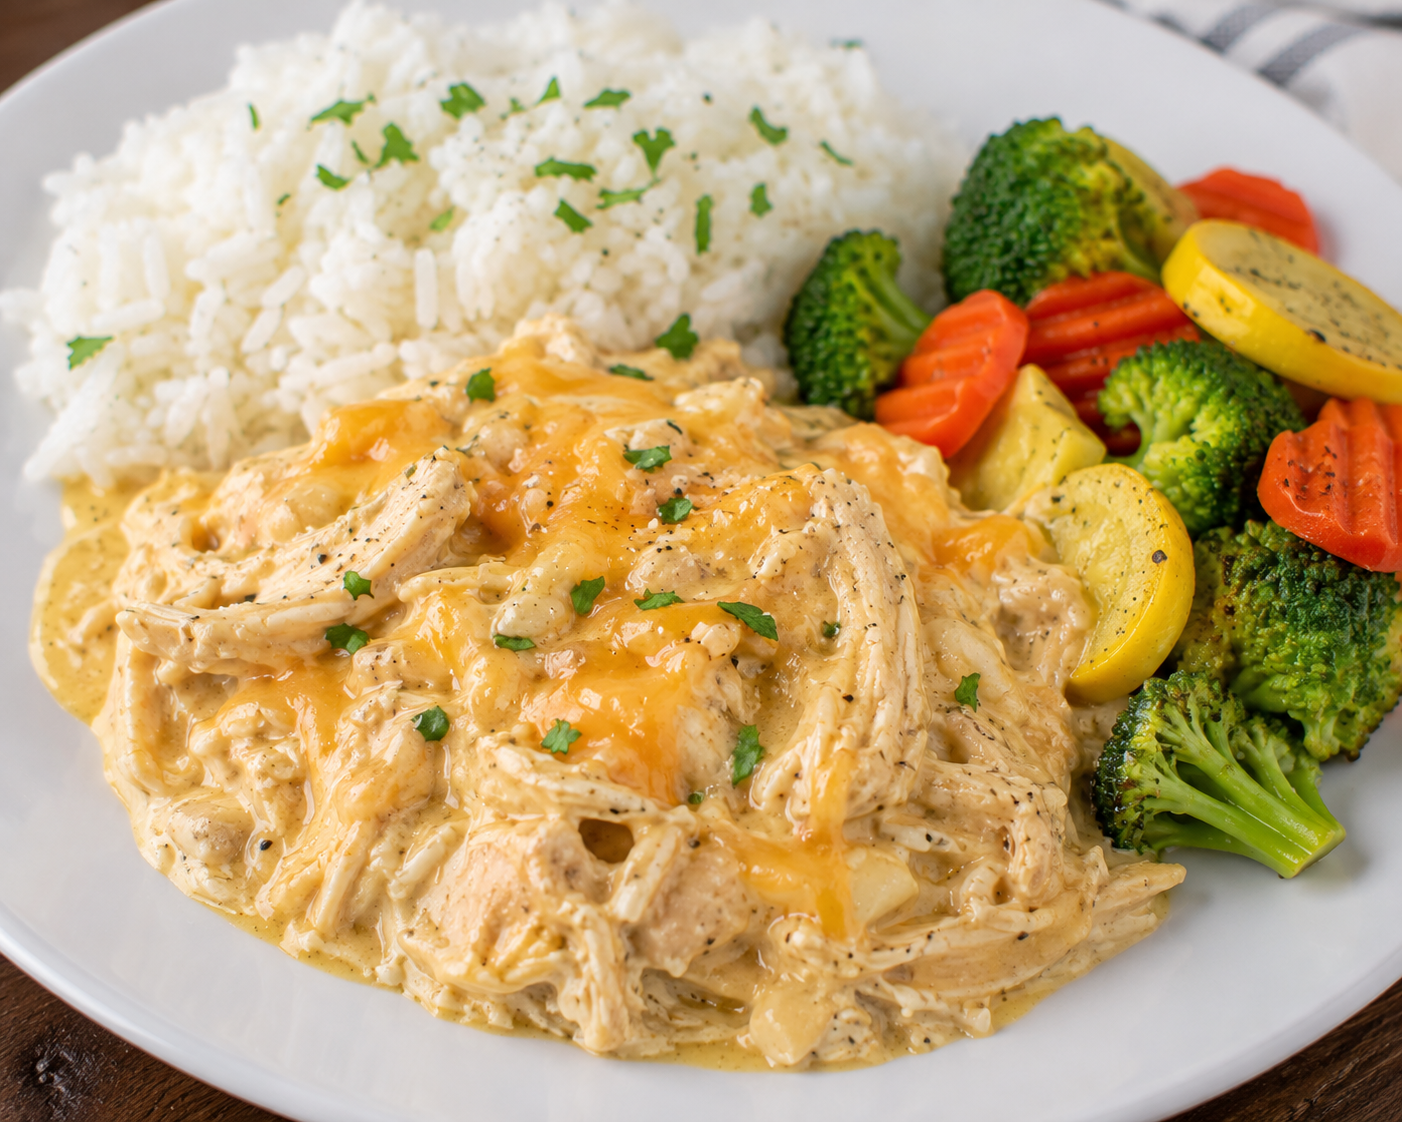
    Tender chicken slowly cooks in a savory ranch sauce before being shredded and combined with cream cheese and melted cheddar. The result is creamy, cheesy, and perfect for spooning over mashed potatoes, rice, or egg noodles.

    It’s a great recipe to keep handy for busy weeknights when you want a homemade dinner without spending the evening in the kitchen.

    Why You’ll Love This Recipe

    This recipe uses just a handful of simple ingredients and only takes about 10 minutes to prepare. The slow cooker handles most of the work, and the finished chicken can be served several different ways.

    Leftovers are also great for lunch the next day. Try using the chicken in wraps, sandwiches, or over a baked potato.

    Creamy Ranch Chicken Recipe

    Prep Time: 10 minutes
    Cook Time: 6–7 hours on Low or 3–4 hours on High
    Servings: 6

    Ingredients

    • 2 lbs boneless, skinless chicken breasts
    • 1 packet ranch seasoning
    • 8 oz cream cheese
    • 1 can cream of chicken soup
    • ½ cup chicken broth
    • 1 cup shredded cheddar cheese

    Directions

    1. Place the chicken in the slow cooker.
    2. Add the cream of chicken soup, chicken broth, and ranch seasoning.
    3. Cover and cook until the chicken is tender and reaches a safe internal temperature.
    4. Shred the chicken using two forks.
    5. Stir in the cream cheese until the sauce becomes smooth and creamy.
    6. Sprinkle shredded cheddar over the top and allow it to melt before serving.

    What to Serve With Creamy Ranch Chicken

    This creamy chicken pairs especially well with mashed potatoes because they soak up all that delicious sauce. You can also serve it over rice or egg noodles.

    For a lighter side, add steamed broccoli, green beans, or another favorite vegetable.

    Make It Your Own

    Boneless chicken thighs can be substituted for chicken breasts if you prefer darker, juicier meat.

    For a lighter variation, try reduced-fat cream cheese along with lower-sodium cream of chicken soup and ranch seasoning.

    Estimated Nutrition

    Approximately 450 calories per serving, with about 40g protein, 8g carbohydrates, and 28g fat.

    Nutrition information is an estimate and will vary depending on the specific ingredients and brands used.

    Have You Tried It?

    If you make this Creamy Ranch Chicken, leave a comment and tell me how you served it. Did you choose mashed potatoes, rice, noodles, or come up with something completely different?

    And if your family has a favorite addition or variation, share that too. Your idea might inspire someone else’s next dinner!

    Creamy Ranch Chicken

    Prep Time10 minutes
    Cook Time6 hours
    Course: Main Course
    Servings: 6

    Ingredients

    • 2 pounds boneless chicken breasts
    • 1 packet ranch seasoning
    • 8 oz cream cheese
    • 1 can cream of chicken soup
    • ½ cup chicken broth
    • 1 cup shredded cheddar cheese

    Instructions

    • Place chicken, soup, broth, and ranch seasoning into the crockpot.
    • Cook until the chicken is tender.
    • Shred the chicken.
    • Stir in cream cheese until smooth.
    • Sprinkle cheddar over the top before serving.

    Notes

    Serving Suggestions: Rice, mashed potatoes, egg noodles, or sandwich rolls.