
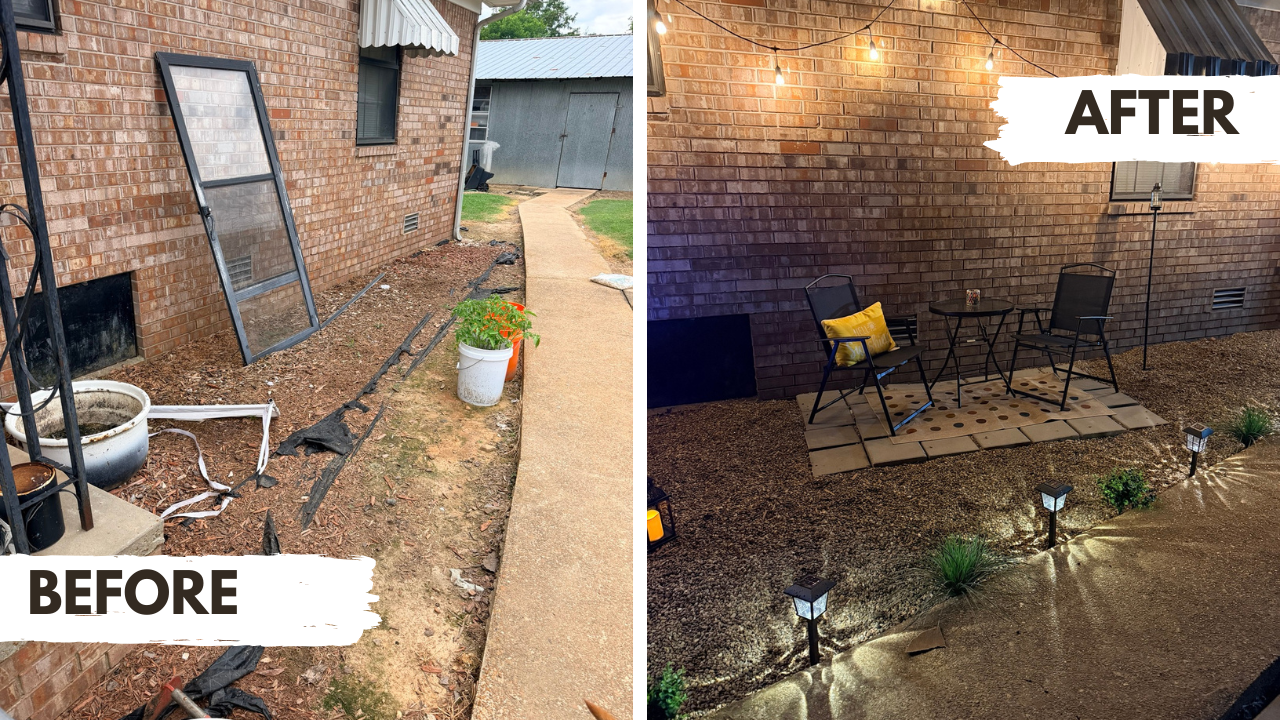
Sometimes the most rewarding DIY projects begin with a single photo and a simple dream”
When I first looked at the side of our house, I didn’t see an outdoor retreat.
I saw old mulch, weeds, exposed landscape fabric, and a narrow space we walked through every day without giving it a second thought.
It wasn’t ugly – it just wasn’t inviting.
Then one evening while scrolling through backyard inspiration on Pinterest and after asking AI for help, I found my inspiration. I saved the photo and got to planning my budget.
I knew it wouldn’t happen overnight, but I also knew it didn’t have to cost thousands of dollars.
This became one of my favorite DIY projects.
Before the Makeover

Looking back now, it’s amazing how much potential was hiding in this space.
The flower bed had become overgrown.
The old mulch had faded.
Landscape fabric was sticking out in several places.
There wasn’t anywhere to sit, relax, or enjoy the outdoors.
Honestly, it had become one of those areas you simply ignored.
Instead of seeing what it was, I started imaging what it could become.
The Inspiration

Every DIY project starts somewhere.
I loved that the inspiration photo featured:
- Warm café string lights
- Decorative rock landscaping
- Comfortable patio seating
- Layered outdoor lighting
- Beautiful potted plants
- A simple but elegant design
I wanted to capture the same feeling—a cozy outdoor retreat that reflected our own style while staying within a realistic budget.
That photo became the blueprint for everything that followed.
Planning the Project
One thing I’ve learned over the years is that every successful DIY project starts with a plan.
Instead of rushing to buy furniture, I focused on the foundation first.
I sketched out the layout on paper and measured the space so I knew exactly how many pavers, bags of gravel, and landscape fabric I would need.
That simple step saved both time and money.
Tip:
Measure everything twice before buying materials. It prevents unnecessary trips back to the store and helps avoid overspending.
Step 1: Cleaning Up the Space
The first weekend wasn’t glamorous.
I spent hours removing old mulch, pulling weeds, cleaning out debris, and removing damaged landscape fabric.
It wasn’t exciting work, but it made the biggest difference.
Sometimes the hardest part of a makeover is simply preparing the space.
Step 2: Installing the Foundation
Once everything was cleaned up, I installed fresh landscape fabric before spreading decorative gravel.
This one step will help reduce weeds and keep maintenance to a minimum.
Then I laid the pavers to create a dedicated seating area.
Immediately, the space began feeling like an outdoor room instead of just another flower bed.
Helpful Tip
Use a level while laying pavers.
Taking a few extra minutes to level each one makes the furniture much more stable later.
Step 3: Adding the Lighting
Lighting completely transformed this project.
During the day, the space is simple.
At night, it becomes warm, inviting, and relaxing.
I layered several different types of lighting:
- Edison café string lights
- Solar pathway lights
- Decorative lanterns
- LED fairy lights to the planter
Using multiple light sources creates depth and makes the space feel much more expensive than it actually is.
Helpful Tip
Mix overhead lighting with ground lighting.
The combination creates a cozy atmosphere while improving visibility.
Step 4: Decorating the Space
Once the hard work was finished, it was finally time for my favorite part.
Decorating.
Adding the outdoor rug, yellow accent pillow, lantern, and greenery instantly made everything feel complete.
Little details truly make a space feel like home.
Shopping on a Budget
One thing I quickly learned is that creating a beautiful outdoor space doesn’t require shopping at expensive landscape stores.
I mixed products from several retailers to get the look I wanted without overspending.
Some of the links below are affiliate links. If you purchase through these links, I may earn a small commission at no additional cost to you. Thank you for supporting my DIY projects!
🏡 Home Depot
Home Depot became my go-to for the foundation of the project.
- Concrete Pavers
- Decorative Landscape Gravel
- Landscape Fabric
- Outdoor Potting Soil & Mulch
- Tiki Torch
Amazon Alternatives
🛒 Walmart
Walmart is where I found several affordable decor pieces and the outdoor seating.
Amazon Alternatives
🎨 Hobby Lobby
Hobby Lobby added those little decorative touches that gave the small space personality.
Amazon Alternatives
📦 Amazon
Amazon made most of this possible especially with the lighting. And as always, Amazon is my most favorite place to purchase my DIY supplies.
Amazon Alternatives
- 👉 Farmhouse Lantern Decor
- 👉 Outdoor Battery Operated Fairy Lights
- 👉 Outdoor Extension Cord
- 👉 Outdoor Rug
The Finished Backyard Retreat

Now this has become one of my favorite places to relax.
After dinner, I love stepping outside, turning on the cafe lights, and simply sitting with a cup of tea while watching the dogs explore the yard.
It’s amazing how a space we barely noticed has become somewhere we intentionally spend time.
That feeling is worth every weekend spent working on this project.
Can This Project Work for Any Budget?
Absolutely.
One thing I love about this makeover is how flexible it is.
Budget-Friendly ($100–$300)
- Solar lights
- Two chairs you already own
- Decorative gravel refresh
- Outdoor rug
- String lights
Mid-Range ($300–$700)
- Paver patio
- New furniture
- Decorative planters
- Landscape edging
- Additional lighting
Complete Makeover ($700+)
- Larger patio
- Premium outdoor furniture
- More landscaping
- Hanging plants
- Smart outdoor lighting
You can also adapt this idea for:
- Apartment patios
- Small backyards
- Side yards
- Courtyards
- Townhome outdoor spaces
Start with one section. You can always build on it over time.
My Biggest Takeaway
Looking back at the before photo, I never imagined this little side yard would become one of our favorite places at home.
This project reminded me that DIY isn’t about perfection.
It’s about creating spaces that bring people together.
The inspiration photo gave me the vision.
The weekends of work made it happen.
And now every evening, when those lights come on, I’m reminded that sometimes the smallest changes make the biggest difference.
I’d Love to Hear From You!
Have you transformed an overlooked space in your home?
Was there a Pinterest photo or magazine image that inspired your project?
Share your DIY story, favorite backyard ideas, or questions in the comments below. I love seeing how others create beautiful spaces on every budget.
If this post inspired you, please share it on Pinterest, Facebook, or with a friend who loves DIY projects. Your support helps my blog grow and encourages me to share even more home improvement ideas.
A Little Thank You: Some links in this post may be affiliate links. If you choose to shop through them, I may earn a small commission at no additional cost to you. As an affiliate, I earn from qualifying purchases. Your support helps keep The daZie Diaries going, and I’m so grateful you’re here. 🤍